As I was deciding how to dress Steven up as Bilbo Baggins
for Halloween this year, I came across an interesting dilemma: How do you show that he is
the hobbit, not just
a hobbit? Clearly the answer was that he needed to be carrying Bilbo's iconic sword, Sting. I actually have a replica of Sting that I got when I was a teenager to use with my Frodo costume. (We used to dress up as characters from Lord of the Rings and hike up mountains. Yeah, we were pretty awesome.) However, giving an energetic almost-two-year-old an actual metal sword to carry around seemed like a pretty bad idea. So I wasn't sure what to do.
Then I came across
this blog post that explained how to make a plush Sting. That was my solution! It seemed doubly fitting, since we still have a
plush sonic screwdriver from Steven's 11th Doctor costume last year. Naturally, I didn't follow the pattern I found on the internet - I wanted to make mine better!
The main trick was finding the supplies I needed at such short notice. (I decided I wanted to make it only 3 days before Halloween!) Thankfully, I found a silver fabric placemat at a local thrift store - that worked for me! I got a dowel out of my craft box, and found some brown fabric in my box of random fabric in the attic. And of course, I had my replica of Sting to use as my pattern.
The first thing to do was trace the pieces I would need to cut from the fabric. I traced quite widely around the sword, since I knew a sword made out of fabric and stuffing would have to be quite a bit bulkier than the original.
I cut the blade and guard together out of the placemat (one for each side), cut the grip out of the brown fabric, and cut the pommel and decorations out of the placemat.
Then it was time to start sewing! I excavated my sewing machine and table (I hadn't done any sewing projects in a really long time!) and decided to use off-white thread, since I didn't have any silver. I also had to be really quiet about it, since it was right outside of Steven's room where he was sleeping!
I started by using a tight zigzag stitch to attach the silver pommel and decorations onto the grip.
Then I used the same stitch to make a line between the blade and the guard and to trace the blade's design.
Then I pinned the two pieces together (right sides in!) and sewed them to make each side of the sword.
The two halves of the sword!
Next I pinned and sewed the two sides of the sword together, right sides in, and sewed it, making sure to leave a gap so I could turn it right-side-out.
Evidently I did not leave a large enough hole for turning the sword right-side-out, because that was the hardest part of the whole process! But finally I managed it after a lot of effort and some definitely-not-swearing. Then I used a dowel to poke out all of the corners and edges.
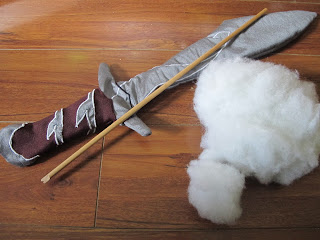
Then it was time to stuff the sword! I put a dowel in the middle so that it wouldn't be floppy, and I packed stuffing around it. I used some of the stuffing from an old pillow that I use for projects like this.
And finally, I hand sewed the final gap closed. I am so pleased with how my "Stuffed Sting" turned out! And I love that I can pass my love of crafts and Lord of the Rings on to the next generation.


