Showing posts with label Costumes. Show all posts

Friday, 25 November 2016

No Sew Hobbit Costume


Last year's Doctor Who costumes were so much fun that I really wanted to have themed costumes again this year for Halloween.  I thought that dressing up as characters from The Hobbit would be great - Jesse could be Gandalf, I could be Galadriel, Steven could be Bilbo, and Kenneth could be baby Smaug.  However, good intentions only get you so far, especially when you have two little kids to keep you busy!  Sadly I wasn't able to make costumes for Jesse and myself, but I did manage to dress up the kids!  I found a discounted little dragon costume for Kenneth, and then made a Bilbo costume for Steven.

Here is what I did to make a cheap and easy no-sew hobbit costume!


The nice thing about hobbit costumes is that you can find the clothes you need at thrift stores and then modify them.  For the Bilbo costume I needed a white button-up shirt, a green vest, brown pants, and a red jacket.


I couldn't find a green vest, but I did find a green shirt for fifty cents.  I didn't want to pull out the sewing machine, so to turn the shirt into a vest I cut the sleeves and collar off, cut it open in the front, and then used masking tape to make the "seams".


I sewed on some buttons from my button jar.


And then because I didn't want to make button holes I just used hot glue to attach some velcro to hold the vest closed.


When you attach the velcro together you can't even tell the buttons are just for decoration!  I guess sewing the buttons on means that this isn't completely "no-sew"... but if you really didn't want to sew the buttons on, you could probably hot glue those too.  I don't know how well the hot glue will hold up long-term, but I just wanted it to last for one day, so I didn't care.


I re-used the jacket from Steven's costume last year.  It was too big for him then, and I had to hem it.  It was still too big for him this year, but I didn't have to hem it as much.  Again because I was going for quick and easy, I used masking tape to hem the sleeves, and used safety pins to hem the sides and then covered the safety pins with masking tape to make sure they didn't come undone by accident.


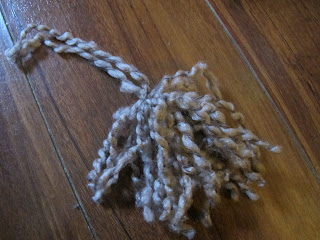
Since we would be trick-or-treating at a local mall, our little hobbit clearly couldn't go barefoot, so I decided to make him furry hobbit feet to attach to his sandals.  I used some yarn that was left over from making this pony.


I cut several strands of similar lengths and then used another piece to tie them all together in the middle.


Then I brought the two sides together to make a pom-pom-like mass of yarn.  I also unraveled some of the yarn so it didn't look as tidy and yarn-like.


Hairy hobbit feet tied to the sandals.


One little hobbit, ready to go on an adventure!  Now all you need is a sleepy little baby Smaug.


Thursday, 12 November 2015

TARDIS Costume

For Halloween this year, our family all wore Doctor Who costumes.  I was the TARDIS (basically a time machine that looks like a British police box, for those who don't know).  I had seen some pictures on pinterest of TARDIS dresses, so I thought that would be fun to try.

I started by scouring thrift stores for royal blue coloured clothes.  I ended up finding a skirt and top.  I also got a yellow shirt and a black sash.  I had some back heels at home, which completed what I needed for the costume.


Unlike my husband's and son's 11th Doctor costumes which needed very little done to the pieces I found at thrift stores, I had a bit more work to do for my TARDIS costume.


"Police Box" Belt


The first thing I did was add lettering to the sash so that it read "Police Public Call Box".  I used acrylic paint, since that's what I had around the house.  It was painstaking work to freehand the lettering, but I was very happy with how it turned out.


Windows

Next I had to make the iconic police box windows.  I decided to remove the front pockets off the blue shirt and replace them with windows.


I cut out white rectangles of fabric, pinning them where the pockets used to be.


Then I used a wide zigzag stitch to attach the white fabric and trace the shape of the windows.  I ended up tracing over it a couple of times to make the lines more solid-looking.


Police Box Sign

And finally I added the police box sign.  To do this, I researched how to print on fabric and found a helpful tutorial that explains how you can use freezer paper.


You cut a piece of your fabric that is slightly larger than 8 1/2 x 11 and iron it to make sure that it is very flat.  Then you cut an 8 1/2 x 11 piece of freezer paper.  Freezer paper has a wax coating only on one side.  You put your fabric on the ironing board wrong side up and place the freezer paper wax side down on the fabric, ironing it so that the freezer paper sticks to the fabric.  Then trim it so that it is exactly 8 1/2 x 11 (the size of regular printer paper).


Then you set up the printer to print high quality on "other" photo paper and print on the right side of the fabric that has the freezer paper attached to the other side.  This process worked pretty well for me, but I had a hard time getting our printer to accept the fabric/freezer paper.  But with Steve's help we were able to trick the printer into accepting it and the final product looked really good!


Then you peel the freezer paper off the fabric and trim the fabric down to the size you want to use.  I used my sewing machine to attach the fabric sign to the skirt.


Then all that was left for me to do was assemble all of the pieces together to make my TARDIS outfit!


Thursday, 5 November 2015

11th Doctor Costumes

The process of putting together two 11th Doctor costumes primarily involved several trips to thrift stores.  Pretty much everything we needed we were able to find second hand or already had around the house.  We ordered the sonic screwdrivers online, and I made the bowties.  (Check out the tutorial here.)

All of the pieces for the big doctor costume

All of the pieces for the little doctor costume

The jacket we found for Steven was way too big, but I didn't think we would be able to find anything that good in his size so we got it and I used masking tape and some temporary stitching to get it down to his size.


I love making thrift store costumes.  None of the pieces that you find are exactly right, but somehow when you put them all together they look great!


Trick or treat!


You can also check out how I made my TARDIS costume!